☆ How to Make an Enamel Pin ☆
Added 2021-02-03 13:05:14 +0000 UTCGood Aftermorning Guys! ୧ʕ•̀ᴥ•́ʔ୨
I was thinking of what kind of other content I would be able to give you recently. And I thought it might be slightly interesting or helpful to walk you through the process of making an enamel pin!
I know from personal experience it can be quite daunting, especially if you want to do it the cost effective way.
☆ Step 1 - Design ☆
Obviously, you're going to need a design!
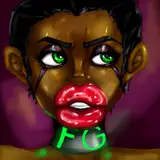
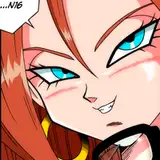
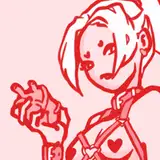
For the instance of this tutorial I'm going to use my Harlivy pin.
I originally made this piece from a doodle I did at work, but I can't for the life of me find the sticky note or picture I took of it.
I came up with a couple other color variations but this sunset vibe one is my favorite.

As you can probably understand this design is much too complex for a pin design though. So it needed to be simplified.
Therefore I tweaked it a little and came up with this...

As you can see, I changed the colors as I thought the pink/purple hues would transfer a lot better to a physical product.
The design photo doesn't need to be a super pretty and detailed document or photo, it just needs to be able to convey what you want as a product.
☆ Make sure to include the colors you want. Specifically from the pantone website.
If you don't know what the pantone website is, its basically a color selection or predetermined colors that everyone can recreate. This makes it easier for manufacturers to select the same color you have chosen.
All colors are slightly different dependent on what screen you use; so you wouldn't want to pick a pastel green and it come out neon lime on the final product.
The pantone website is free to use and has a color library.
I normally just screenshot the color/code & paste it near my design.
https://www.pantone.com/uk/en/color-finder
☆ Step 2 - Finding a manufacturer ☆
Okay, I'm not gonna lie this is the tricky bit, but once its done you're good.
You have two options really...
☆ The Enamel Pin Factory
https://enamelpinfactory.com/
This is kind of like an intermediary source, they communicate with the factory in china and save you having to find your own manufacturer. It's a little easier than going to Alibaba, searching through millions of listings and not being happy with the quality.
A couple points to note:
☆ You can only order certain sizes and only up to 40mm
☆ They only have 3 plating options
☆ Only up to 10 colors
☆ The prices are A LOT higher than Alibaba
(a minimal detail , 2 color, 35mm pin is around £175 for 50)
This is all fine for beginner pin making I think, as they do offer glitter colors, cut outs and back stamps.
However, I have used them twice and have had mixed results.
After you buy your pin option you are invited to the Trello board in which you communicate directly with the factory in China. This surprised me a little as I thought they were meant to do that. There are obvious communication issues occasionally which has lead (in my experience) to not produce what I wanted.
If you are a beginner and want that extra little bit of security dealing with an established storefront and company then this is a good option; if you don't also mind the large price tag. Just be weary and careful. Make sure what you design is taken into account, and that you check the proofs well.
☆ Alibaba
www.alibaba.com/
I would greatly suggest using the app instead of the website.
I'll try and walk you through this as best I can, because Alibaba can be confusing as hell.
You'll first want to make an account and all that jazz.
Once that's done you can request for a quotation.
What this does is post a request on Alibaba to manufacturers that you are looking to make a pin (or whatever product you're looking for).
The request quotation post will prompt you to fill in some information, for example: Product name, quantity pieces etc.
I like to include the following information in the description to be able to get the most accurate quotations:
☆ Size (inches or mm)
☆ Soft or hard enamel
☆ Plating (gold, silver, etc.)
☆ Colors (number of colors in design)
☆ Type of clasp (rubber, metal, color?)
☆ Screen Printing (This is on top printing that wont be apart of the metal design. You can use this for details like highlights etc.) Manufacturers tend to quote this by color, so make sure to include how many colors you have to be screen printed. It is also sometimes called silk printing.
☆ I also tend to put in my description that I would like to pay 50% upfront and 50% upon completion. This protects me a little more if the Manufacturer makes a mistake on my design or won't show it to me before posting.
☆ You can also request for previous product photos, I like to do this to check quality.
Samples
☆ If you have a design that has screen-print or color details you are not sure about then request a sample to be made first. This way you can check it before it is put into full production. They do normally charge for this but it is not a large amount.
Please note: You cannot make a sample and then change the actually molded design, this will cost a lot extra and require a new mold. Samples are for checking color and screen-print mainly.
See below for process to request quotation on the app:

You will then get offers and messages with quotations.
Make sure you have a look through several. Some manufacturers may message you to say hello and that they will have a quote for you soon.
I would suggest reading reviews on their pages, and if the price looks too low for the quality that they're showing you probably best to discard that quote.
☆ Prices
For reference this is what I have paid for my pins from Alibaba.
☆ Harlivy
2 Inches, 6 colours, 3 screen printing
50pcs
$184 or £134
☆ Macaron
40mm, 6 colours, 2 screen printing
100pcs
$159 or £116
☆ Batwoman
2.5 Inches, 5 colours, 3 screen printing
50pcs & sample made
$252 or £184
☆ Step 3 - Manufacturing Process ☆
Once you have chosen your manufacturer and sent them your design and either paid in half or full - they will come back with a proof. It will look a bit like this:

Once you have this be sure to check it really, really, really thoroughly as in principle once you agree to this proof they will move onto the next step. Any issues that are missed on the proof will be your responsibility not the manufacturer as you approved it.
As you can see from the image, its not exactly what I was going for. I wanted there to be more cut outs in-between the hair loops and some hair strands weren't the correct colors.
So, I edited the design a little making the spaces bigger and sent it back revised.

After receiving the new design image, they send me another proof which is perfect!
You can confirm its ready for production and they can start making it.
I don't understand the actual making process of enamel pins (I have a basic understanding but only what I can gather from YouTube and this process) but the making normally takes 3-6 weeks depending on design/holidays and edits.
☆ Product Image
Once it's complete they will likely send you a product image!
I like to request to see it before screen print but this is optional.

Personally, I get a little worried at this stage, as the lighting and images they send of the product photos tend to not be high quality. But, when I receive them I haven't been disappointed yet with the overall quality! I think it's just down to bad lighting and taking unflattering images.

And it's finished!
Following seeing the final product and being happy with everything make sure to pay the last 50% payment if you've requested installments. Otherwise they tend to ship it out ASAP. I believe the manufactures I've made pins with use UPS to ship, but I can't speak to all of them. Shipping is normally 1 or 2 weeks.
☆ Note that you may have to pay import tax.
I am not fully aware of when/how they charge this as I have only received one notification to pay for import tax. It came in the form of a letter and I just paid it online. Wasn't too expensive.
Customs may also open your package if they think its suspicious. I've had mine cut through once. Pins were unaffected but just note it may happen.

I'm very happy with them, I think they're my favorite pin made so far.
However, a couple of notes to look out for when you receive your pins...
☆ Make sure to check them all carefully.
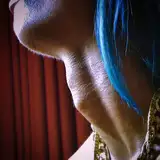
A lot of the Harlivy pins I received had color issues (colours in the wrong places).
You can see in the image below Harley's earring isn't blue like in the design but pink.
I had about 15 pins like this with varying issues (mainly the earring, hair ties and flowers having wrong colours).
These aren't massive issues and don't make them unsellable, you can always list them at a lower cost as B-Grade pins making sure to note that they come with slight imperfections.

If the majority of your order has issues like these (make sure that you check the proof first) then I would go back to your manufacture and discuss this.
If it is a mistake on their part they may offer you a refund of some sort. I haven't experienced this myself, but I would say if over 10-20% of your pins are like this then to go back and discuss it.
☆ By going to Alibaba and using foreign factories you open yourself up to this a little but as they are producing many different designs, at large quantities for low prices. So, just remember to take that into account.
☆ Extra Notes: ☆
☆ Try using the app, its a lot more user friendly and easier to use the chat when discussing quotes and design with your contact.
☆ Be nice to your contact at the manufacturer. Always make sure to say please & thank you for the pictures as having a good relationship with them will make it easier to reorder pins and make new ones.
☆ For backing cards I tend to use Awesome Merch
www.awesomemerchandise.com/
They do a 250 for £5 business card deal which is insane. They're pretty nice quality & easy to use.
Other than that I also sometimes use Moo
www.moo.com
☆ Screen printing is not an option for coloring without having lines.
I've just learned this the hard way.
For my batwoman pin I wanted to have shadows without having metal lines, so I thought I could use screen print to do this.
As you can see below, its a little off.
I have discussed this with my contact and they have advised me that it cannot be 100% accurate all of the time. Which I understand, it can't be changed now and I've learned a lesson. Also, I made sure to note that the screen print in-between the lip was below the lip which wasn't acceptable at all. I can understand the shadows being a little off but the lips have designated lines.
Luckily this was the sample so I could check before paying the extra installment.
Note: this is NOT a good photo, they will look a lot better when I am able to take proper product photos.

Eventually I would like to open an enamel pin tier, but for now I need a lot more experience with running a patreon subscription service. Just posting packages alone is something I'm still trying to get my head around.
If you have any questions or issues regarding the process, I'm always super happy to help. I'm not a seasoned pin maker (I haven't even sold any yet (I'm just hoarding them until my next shop opening) but, I'll try and help where I can ʕ·ᴥ· ʔ/.
☆ Are there any other tutorials or content that you would like to see?
☆ Would you be interested in a Enamel Pin Tier?
Some other images of my pins so far: