
This post documents the process of a piece titled Forest Spirit—which I drew in 2020.
(The name was given by a friend of mine named Meng, big thanks to her! )

Okay! This is a piece from a series I called ‘Childhood’. I wanted to take up this opportunity capture childlike illustrations with this theme. Before starting on this series, my illustrations had a relatively realistic style when it comes to rendering light and shadow.
I’m not talking about the realism that resembles sketching a plaster statue model! These pieces were rendered more realistically as compared to my other works.
The four images below are a set of studies I did in late 2019. I explored blending realistic scenes with characters; and would be talking more about this set of illustrations in the sponsored content section in a few months’ time.

But at the same time, I wondered if I could try something more abstract, more design oriented.
Take this image by Bernie Fuchs as a reference:

He avoided painting the floor, which enabled the clean background to bring out the silhouette of the figure—hence making him stand out. The perspective play was artistically manipulated; avoiding the whole ‘realistic’ realism style and making it interesting.
I wanted to explore this field further and did two new studies.

Most of the elements from the first two works were items from my childhood (I hope I’d be able to find time to write about them later,) hence I wanted to bring in the idea of using an umbrella from my childhood memories for the third illustration.
This was the initial draft. I decided to draw a girl with an umbrella. (the umbrella was still an ordinary umbrella!) The rainforest and toadstools were ideas that slowly came into the larger picture while I was searching for more reference images.
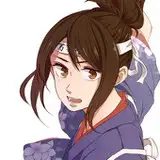
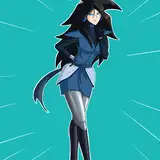
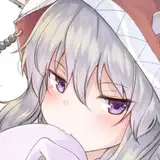
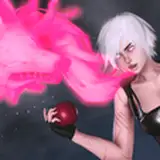
The reference is mainly divided into two parts: for characters and background scenery. The ones I used for illustrating the characters are shown below:

And the references used for background scenery:

I noticed that these toadstools could also be used as an umbrella after looking at the bunch of photos! Hence it was changed to a toadstool umbrella.
Because it has been determined that the background would depict a forest, and the main character would be holding a large toadstool (red background + part of the white pattern), the main character's costume is also naturally established as red + white, as a way to distinguish from the background’s forest (green).
And some surrounding mushrooms as a secondary layer, can not be more eye-catching than the main character, so I chose a more soft orange than red, reference from the picture left 1.


The next step is adding the elements layer by layer to enrich the illustration.
The picture consists of three elements: Point, Line and Plane. Currently the image has points (the small mushrooms around, the pattern on the big mushrooms) and Planes (the characters and the green background), but no lines, so I added the white vertical tree trunks.

But the whole scene still looks a little empty, so I added some more foliage for the main character’s surroundings.

(BTW, the drawing process so far has been a small, independent block of color for each item. I did not make a uniform line drawing or any special layers, so the smaller elements were free to move around. I have been repeatedly moving and adding these small items in this painting, slowly reaching a composition that I think is satisfactory)

Back to the leaves I added some surrounding trees. Now there's a new problem: the leaves above are too close in tone to the background, so I've shifted the background color temperature slightly towards the cooler side. The darker leaves on the right were slightly more bold and saturated, so I lightened them for better visual contrast.


This is after editing most of the tiny details, such as adding branches, adding the girl's bow, before the same small mushrooms to fix a different type, etc..
(Yes, the girl's mushrooms on the right and left side have been copy-pasted and then mirrored, and it will look like you are lazy if you kept the flaw visible, so I had to remember to change up a few strokes to change the shape afterwards)

The previous forest and the ground has been somewhat indistinguishable, so I directly replaced the color of the ground to white and added the dappled shadows of the trees.

Adding light spots for the characters was almost a subconscious decision that entered my mind after adding the shadows for the trees.
At the beginning, I really wanted to draw a rainy day...(Even umbrella was ready!!) Interesting to see the results turn out like this lol
I set my layer mode to Color Dodge for the light spots. Such an effect can also be achieved with the layer mode set to ‘Screen’ or ‘Add’.

More light spots were added on the surface of the umbrella, the girl's hand and the skirt. It’s fine to lay out some uneven bits since it’s not an entirely realistic illustration.

Refinement and adjustment
The final step is making some minor adjustments to further refine the entire image. I added thin line art at some places and changed the border frame to the same white I used in the previous series.
The colors were also tuned a little—for example, the shade of white used on the girl’s apron was too close to the color of the trees, so I changed it to a cooler tone. There were many similar adjustments so I wont be listing them all.

That's all! Thank you for reading.
-
This post was no doubt the main reason that I was so reluctant to start a Patreon page haha… my english isn’t all that fluent to compose an entire painting process on my own. Thanks to my friend Valerie for providing me with English translation help.
The next process record update is estimated to be in a month's time (i.e. around the first day of each month), so you can talk to me in the comments section if you have anything to talk about! I hope the content I've provided is helpful.
So that's it, see you next time! :)
ling
2021-05-03 06:28:53 +0000 UTCSheya
2021-04-29 01:43:33 +0000 UTC경민 노
2021-04-23 15:18:15 +0000 UTCSheya
2021-04-02 02:53:10 +0000 UTCSheya
2021-04-02 02:52:25 +0000 UTCHaruka
2021-04-01 06:37:46 +0000 UTCHan Yang Tay
2021-03-31 19:51:22 +0000 UTCSheya
2021-03-31 15:08:10 +0000 UTCWenshu Yu Zhu
2021-03-31 13:27:42 +0000 UTCKamiyugi
2021-03-31 11:30:25 +0000 UTCSheya
2021-03-31 08:29:36 +0000 UTCMilk Tea
2021-03-31 08:17:20 +0000 UTCSheya
2021-03-31 07:31:19 +0000 UTCfuwa
2021-03-31 07:21:55 +0000 UTC