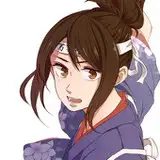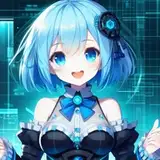

This post documents the process of a piece titled 'Loretta'—which I drew on January 2021.
This illustration took about six hours; I spent one whole afternoon doing it.
The very first sketch... actually would be a throwback to last January.

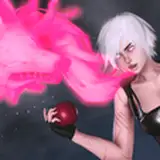
The main idea was to depict a girl holding an apple, and the pictures below were some of the references collected at that point in time.

However, after this draft was drawn, I did not figure out what kind of costume would suit this character (would she be dark and exciting or a gentle lamb like Snow White?) The desire to finish this piece also decreased over time, so I shelved this illustration temporarily.
A year has passed and during the winter break in January 2021, my friends in our school club and I were making indie games.

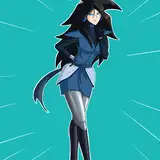
I rediscovered this old piece again in my files and was surprised to find that the little witch I designed in the game fitted pretty well with the apple. So, I changed the previous hood to a witch's hat and redrew the whole draft.

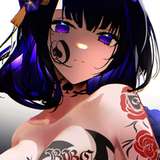
Based on the draft, I sketched another draft—this time with more concise lines.

Of course the color scheme is also taken directly from the game's character!


This time, I chose for the light source to come in from the left.
I recommend people who use an iPad to download an app called MagicPoser for references on lighting and poses—the ones they provide are effective and accurate!


For layers, I set my layer mode to Multiply and drew the shadows according to the model reference.


Because the black cloak was too dark and the light effect was not strong, I set my layer mode to Lighter Color then added a blue light source placed on top of the natural color to brighten up the color of the cloak.


The silhouette of the black fabric under the figure is scribbled roughly; but since I only wanted to shape the upper half of the figure, I simply changed the background to black to weaken the fabric underneath the figure and direct the main visual element to the face and hands of the figure.

Because of the lighting, the whole face of the little witch is in the dark and does not look very distinctive.

I want the face of this picture to be more eye-catching, so I brightened up the shadows of the little witch's face and increased the contrast of the brightness for the outer shadows of the face; the comparison before and after the adjustments made is as follows.

For the secondary colors, I added the whites for the eye, brought some purple to the hat's lining and sweater, and added a gradient to the apple and hair.

Some adjustments were also made to the Lighter Color layer. I added some warm colors that leaned towards skin tones close to the face to reinforce the warm and cold variations of the witch's hat and cape.

You may be wondering—why would the lining of the hat and sweater have a yellow and purple gradient? Considering the figure below, I think the original yellow lining layered with a shade of cool has lost its intial vibrancy in the original color (yellow and purple are complementary colors, the two added together would present gray) so I simply did the opposite, turned yellow to purple, so that the two purples added together would still retain the color's purity.

Once the large color blocks were pretty much settled, I was inclined to merge the entire layers for refinement as the various special layers from earlier were too complex.
I modified the little witch's face, enhanced the hair's curls and layers, and added highlights to the hair, eyes, and apples.
Then, I lightly painted the transition between light and dark purple with the Brush 画笔 on the face, hands, and the location of the light and dark junction line between the apples and the cape.


The shape of the cape was also adjusted, I changed the loose pleats to below the shoulders to further accentuate the shape of her shoulders. Since the bottom side of the cape was completely dark and didn't allow any space to breathe, I used a textured brush 喷溅1 to create a grainy texture; and to add a bit of lightness to the bottom of the cape.
These brushes have been shared in my previous post, VIP2 i.e. above patrons can download them directly.


The refined result at this point is as follows.

In fact, by this point, I had reached an impasse...
Observing the thumbnails of the before and after refinements and you will find that the large blocks of color have hardly changed, or rather, refined, and the image also looks unfinished.

This is a problem that often occurs with doodles, starting with only a general idea, and many of the contents are changed as drawing, so what the final picture will be ...... really depends on the haphazard of attempts.
Some times the situation would get better and better, works can be completed at once, while some times (like this) is at an impasse, many doubts on what to continue with next.

If you also get stuck in a rut, my suggestion is to do something else for a while, like listening to music or taking a walk, waiting for that bit of inspiration to strike you.
In this case, for example, I was inspired by the MV for "something just like this".

The MV for "something just like this" consists mainly of a black background, tiny dotted stars, and some graffiti-style lines.
And it's been a long time since I've tried this kind of relaxed graffiti image ......
Looking back, at the beginning of the year, whether I was taking professional commercial commissions or working on my own works, I was experiencing tighter and tighter drawings due to various constraints. The high level of precision required by the commercial projects and the reasonable judgment range required in game made me more and more cautious when drawing. I gradually discarded those random lines and haphazard strokes.
But as a doodle, it should be done freely!
I added some very casual lines along the brim of the little witch's hat, hair and folds of her coat.


The effect, unexpectedly, is very good!
These messy lines are hardly very specific in form, but they also show the shape of the figure and make the whole picture looks pretty relaxing.
On the basis of the white lines, I continued to add more diverse elements.

I added some red and yellow brush strokes to echo the colors of the red apple and yellow sweater. The bracelet, ring and star were also added in red and yellow respectively, in the form of casual graffiti.

Finally, I added purple text to compliment the purple of the brim.

The final illustration had just a little bit of toning change. I shifted the violet shades a bit towards cyan and brightened up the light areas again.
That's all! Thank you for reading.
-
Hi guys! So that is the Behind the scenes + process for May, I hope the content I've provided is helpful.
I will publish the link of the psd file of this picture in a few days, as well as the unpublished illustrations of the month.
Still thanks to my friend Valerie for providing me with help for English translations, and you're welcome to comment if you have anything to talk about!
See you next time!
Sheya
2021-05-08 01:34:24 +0000 UTCFury
2021-05-02 17:04:44 +0000 UTCtiffu
2021-05-02 07:50:20 +0000 UTCMilk Tea
2021-05-02 06:44:03 +0000 UTCSheya
2021-05-02 06:35:58 +0000 UTCSheya
2021-05-02 06:35:47 +0000 UTCSheya
2021-05-02 06:35:25 +0000 UTCSheya
2021-05-02 06:35:10 +0000 UTCAmy
2021-05-01 17:22:27 +0000 UTCtiffu
2021-05-01 16:25:20 +0000 UTCMilk Tea
2021-05-01 16:14:07 +0000 UTC윤
2021-05-01 14:04:14 +0000 UTC