Behind the scenes + process: Books
Added 2021-09-01 04:19:49 +0000 UTC
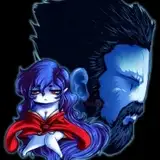
This article documents the process of an experimental work from 2019. It took me a week to finish this illustration, and it is also one of my earliest illustrations to use photos in the background.
Inspiration
Throwback to August 2019—I was still very unsure on how to proceed with drawing backgrounds for illustrations. I saw some tutorials on social media in manipulating photos into illustrative backgrounds and have been wanting to give it a try.

During a summer trip to an elementary school, I noticed a room with many textbooks piled up on a table. The bottom of the pile left just enough space for one person to lie in the pile.

Model reference
Because the photo was taken from the perspective of a difficult top view, I used the MagicPoser model for a perspective human reference and added the right light as a new light source reference.

Based on the model, the draft's character shape is clarified.

Then, I created a new layer on top of the draft’s model to further refine the shapes and added the inherent colors for the character.


Then, use the auto-selection tool to select the shadow area of the previous photo and model drawing to get the shadow’s layer.


(Details of the operation can be found in the previous series Different Seasons: https://www.patreon.com/posts/behind-scenes-51590958

Lightening adjustment
It might seem that there’s nothing wrong with the current lighting; but there’s a few imperfections lying within it. For example, it does not take the new shadow areas created by the character and the book pile blocking each other into account.
To make the illustration more accurate, I created two new obstacles in MagicPoser to simulate the effect of the book pile to the right of the character and the back of the character's lighting.

The gift box and cuboid represents book stacks on the right and in the middle of the photo respectively. With reference to the model, we have identified two new areas with shadows.
1. the shadow caused by the right book stack blocking the figure (red block field in the picture)
2. the shadow caused by the model on the book pile in the back (blue block field in the picture)

According to the red reference, the figure would be in the shadowed area under both the head and the cover of the book pile, so I modified the shadows.

According to the blue reference, the front-most cardboard would also cause some shadows to the figure in the back. I roughly projected the shadow area caused by the triangular cardboard in the lower right corner, so that the figure's crotch is also in the shadow.

Afterwards, I used the brush tool to clean up the rough edges from the previous selection and adjusted the overall shape.

Coordinate colors
The purity of the previous shadows was extremely low, and the elements were also in large shadowed areas—which inevitably made the whole picture dark and squishy.

Hence, I directly adjusted the color of the shadow layer.
I lightened the shadows at the top of the image to a light brown, so that the image has a smoother visual flow and layout. The junction line between the hands and legs is also slightly sprayed with light orange noise; so that the transition between light and dark skin is softer.


Process Photo
Previously, I made use of the shadowed area from the image to give the picture a more complete look. However, the current book is still blank in the lighted area. Figuring out a quick way to add a rich amount of content on the covers became a problem for me.

I wanted to use the book covers from the photo directly in this illustration. However, when I placed the original photo at the bottom of the image, the dark shadows of the photo did not sync up; disrupting the rhythm of the whole image.

In order to tackle this issue, I first used the Curves tool to brighten up the darker areas of the book pile.


The background is now much brighter, but the image is still a bit odd - I realized that the tones of the photo and the people are not quite in tune, with the darker parts of the people being noticeably reddish and the darker parts of the photo being too gray.
Using the color balance tool, I tinted the dark parts of the photo red and the light parts green.


Upon many attempts and arriving at this stage, I think the color of the picture is now more consistent. The final problem left to solve is that the photo is too realistic and even the distant scenes are too visually cluttered. Hence, I used Gaussian blur to blur the background of the photo to make the distant scene more fuzzy looking.


Final Refinement
With all the large color blocks in the picture defined, I merged all the layers above and started to refine the piece.
I added highlights to the hair and a second layer of shadows below the neck; softening the edges where the light and dark lines intersect. I also cleared up some rougher lines at this stage to make them more refined and clear.


For the books, I erased all remaining cover marks from the previous photo and added brush strokes to paint over the rough edges caused by the auto-selection tool to make the rough edges disappear completely.


Finished draft
The final draft has only a few minor adjustments. I slightly increased the saturation of the red tones and the contrast of the image. The illustration is now finished.
-
In the lighting trade-offs, I personally will pay great attention to the scene’s illustration of the characters and various items in the shade and the relationship between the shadow effect, for example, the book pile and cardboard to the characters caused by the shade, can not imagine it will deliberately use the model to build, so that the picture light as realistic as possible.
Regarding lighting trade-offs, I personally will pay more attention to the relationship between the scene’s characters and elements in the shade and the ones in the shadows. For example, the pile of books and cardboard casted a shadow upon the character. Instances like these wouldn’t make the model entirely accurate to rely on—hence additional steps were to be taken to make the lighting as realistic as it can get.
That’s all! Still sending thanks to my friend Valerie for providing me with help for the English translations. You're welcome to comment if you have anything to talk about!
See you next time!
Comments
Gotcha! Thank you so much! ^-^
Ashley
2022-02-25 21:38:54 +0000 UTCYes I think it helps! Remember to click on "Replace" to switch different models (they have anime and realistic styles)
Sheya
2022-02-24 08:03:52 +0000 UTCAhhhh thank you so much! I thought it was only on mobile! Sorry, one last question. Do you think this program could help me learn how to draw different face angles in the anime style? This is what I want to focus learning more about. :O
Ashley
2022-02-18 19:32:51 +0000 UTCHi Ashley! For PC I recommend Daz 3D! (But it's relatively complicated to use.) I also found the web version of MagicPoser! Hope it helps: https://webapp.magicposer.com/
Sheya
2022-02-18 15:45:13 +0000 UTCHello! My phone is pretty old and doesn't like me downloading many apps like Magic Poser. Are there any PC programs you recommend that are similar to Magic Poser? I want to improve my anatomy skills but I don't know where to start. D:
Ashley
2022-02-13 03:32:48 +0000 UTC