Behind the scenes + process: Koto
Added 2021-10-01 13:00:09 +0000 UTC
This post documents the process of an experimental piece done this year. The process for this particular piece involves the assistance from 3D modeling softwares (in this case it’s Daz3D and blender), so please note that it may be a little difficult to comprehend some parts of it if you have yet to explore this area.
Inspiration
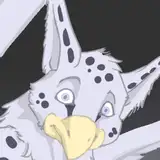
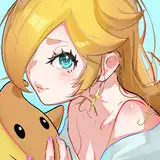
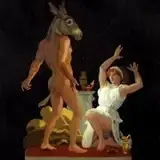
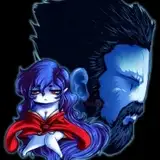
I had my playlist on and the OP of Kyousougiga came on, which reminded me of when I was a big fan of this animation back in Junior High. Koto’s persona really left an impression on me, so I casually painted a few strokes while listening to the music.


I drafted out three sketches. Upon finishing the third, I felt that I could slightly improve the pose to fit an illustration.
Using Daz & Blender
This sketch itself wasn’t very difficult to do, but I was into 3D modeling and curious about the softwares in that particular period—hence the attempt at trying a model-assist drawing method with this illustration.
I used two softwares - Daz and Blender.

Daz is a 3D modeling software that comes with a myriad variety of 3D character models in its library. It’s great since it allows users to change the human skeleton and pose, as well as to create a variety of character animations.

You may ask, what is the difference between this and the Magic Poser app that I recommended before? Well, the human muscles in Daz3D are relatively much more realistic as compared to Magic Poser.
Speaking realistically, muscle shapes vary across different human bodies and the way they stretch. Daz 3D adjusts the muscles accordingly to the character’s movements, which makes the model reference a lot more realistic.

I used the Sakura model in Daz3D, adjusted the pose according to the draft, and then imported it into Blender to add lighting.

Blender is a free, open source 3D graphics and imaging software that provides production solutions for modeling, animation, materials, rendering and more.
The steps taken this time are quite simple. Shift+A adds a cylinder—Koto's weapon.


Shift+A again to add a new point light to the character.

Then select Eevee for the rendering engine and click on the render mode (ball icon) on the far right.


A clear reference, complete with light and shadow is completed.

I have yet to decide on the final composition since my earlier drafts were pretty random. I placed various objects in Blender and adjusted the position of light to determine the final composition.

I felt that the way the light source brings out the character’s body shape turned out pretty great–the contrast between the body and shadow cast from the stage light was present. Based on this version, I considered adjusting the character’s props to enrich the existing shadows. Koto’s toy rabbit and bowknot were then added to make the layout look more complete.

As compared to 3d modeling experts, my 3D modeling abilities are bad. Instead of accurately restoring every decorative detail on the character, I resorted to simple geometry to establish a basic sense of 3D and determine the general locations for the shadows casted.
For example, the toy rabbit is built with just a few spheres and cones.


And the bowknot on the head was even easier; just use the monkey head flattened in Blender to simulate the silhouette’s shape.
Finally, change the lighting settings from Point to Spot light.

A rich stage light effect complete with the character has come out!

Although the models of toys and figures were very sketchy, their shadows still can serve as a very specific reference source, and it is quite easy to project the shadows of her hair and skirt on this basis.


Move the spotlight down slightly so that the picture forms a horizontal composition of a square + triangle.

The modeling process at this step is pretty much complete. I personally prefer painting and rendering myself step by step rather than finishing everything in the modeling software. This 3D model acts more as a lighting reference, so the shaping at a later time is more accurate.
Importing to Procreate
After that, the process is the same old story of putting the rendered image into the painting software.

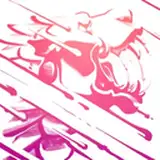
Create a new red Color Burn layer to give the screen a warm red tone.

The figure is then drawn from the model with the base colors added.


Add shadows to the figure through a positive overlay layer, then darken the layer with the same red color in order to make the figure match the environment.

Place the drawn figure on top of the background to get the following effect.

Rich Background
The previous background was only a red wall, which seemed a bit plain and monotonous. With reference to the scene in animation still, I tried to add the red and white pattern of the wall and green trees.


Because the color and lighting have been merged into the same layer earlier, it's kinda tricky to add decoration on top of that...you can see that I used a lot of different special layers.
Layer properties can be taken a closer look at the PSD file, but if layers are not merged earlier, there is no need for such trouble.
The actual color of the tree is darker than the red background, so the tree is colored with linear deepening.

And the white vertical lines were brighter than the background, so I used the soft light layer to brighten the composition.

Spray a black gradient around the image to give the center more attention and contrast.

Refine Characters
Since the background is almost complete, all’s left is refining the character. Still merging the entire layer directly for more depth, (if you have read my previous posts, there is actually nothing to elaborate here...just add details on a layer).


I ended up using the sketch for the left foot of the figure because upon paying closer attention, the 3D model’s center of gravity was a little inaccurate. It is possible to correct any stiffness in the model during the refinement of the figure without having to follow the rendered image closely.

Put the refined characters and background together, and the picture is already very complete :D


Fine-tuning colors and adding dotted decoration
Since both light and dark parts of the previous image were very reddish, I tuned the darker parts to a slightly more blue-violet tone. The trees in the background were also slightly refined.

Add colorful fireworks in the more empty areas on the canvas to add a more dynamic sense and detail to the entire scene.


Add glitter to metallic items.


This ball is not metal... but added anyway :P
Finally, based on the previous shadows, add the projected braid shadow and the illustration is finished!

This time, I mainly wanted to introduce the modeling assisted drawing method. If you are interested in it, you can take the time to search up Daz3D and Blender. There are quite a lot of tutorials up on Youtube.
When you hear about modeling, you may think that you must build a high-quality model exactly like the real thing. But as long as you know how to perfect the image in your painting, none of these things are necessary. (Take my example of this picture: only using the addition and compression of items and lighting rendering, many complex modeling skills were not used at all.) This post showed how to use the softwares with a shortcut for learning.
That’s all! Still sending thanks to my friend Valerie for helping me with the English translations. You're welcome to comment if you have anything
to talk about!
See you next time!
Comments
WOWWW, THANK you sooo soo much for sharing your process!! It's soo well planned out!! Can't wait to see more of your Awesome works in the future \(@^0^@)/
Roshani Gladson
2021-10-03 17:36:34 +0000 UTCahhh thank you so much for sharing! i felt like I'm better at art everytime you post something like this >< i really love your artworks so much
Milk Tea
2021-10-01 13:20:05 +0000 UTC