Behind the scenes + process: Alkaid
Added 2022-04-01 05:01:02 +0000 UTC
This post documents the process of a piece titled Alkaid—which I drew in 2020.
Since the first day I set patreon, people have been asking about the process of this sunflower girl, and it's finally available to every patreon!
Drawing Origin
This illustration is the cover for my artbook Alkaid, and the tutorial of this illustration is documented in that book. Here I quote a short description:
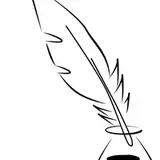
The original draft. The girl in the sunflower bush.
I have thought about choosing some new themes to give people a deep impression, but considering that the cover needed to establish a connection with the content of the book, I started with the most common themes in the whole book.
There are many illustrations about girls and nature, but there are actually no sunflowers, which should be a common theme by definition, so why is that? I then jumped at the chance to try.
Reference Collection
The reference collection is divided into three main categories: color, shape, and shadow.
In terms of color, as the cover of an artbook, I wanted it to be a vibrant, impressionistic colorful work, so I searched for the following works for reference.
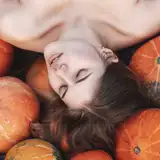
In the modeling and lighting, I searched for photos close to the character's movements, then used MagicPoser to build a model pose for lighting reference.
The Sunflower reference collection is also essential. I searched for a large number of realistic photos.
It is worth mentioning that all reference photos for this image were found on copyright-free websites. If you have read my previous posts, you should know that I rely on the auto-selection tool on photos for most of my scenes, and I rarely hand-drawn scenes.
When I drew this illustration, I originally wanted to go to a nearby sunflower field for an afternoon of fun and then photograph the materials I needed. However, the COVID-19 was terrible, and the pressure of school and work made it impossible for me to go out. If I still wanted to edit photos in the cover of my artbook, I had to make sure that the images used were in the CC0 public domain and free for personal and commercial use.


The site I was using was pxhere, a free commercially available photography gallery, and similar sites like pexels, unsplash, etc. If you are also someone who likes to use photos, please be sure to check the source of them to avoid infringement disputes.
Photo background processing
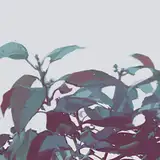
The previously collected photos were extracted for the outer contours to get the sunflower field at the bottom.

Place the sunflower field behind the figure layer and select the shadows through the Automatic selection tool.
The gap area left by the automatic selection tool subtly forms rich spots of light, the picture is sparse at the top and dense at the bottom, and the contrast between the complexity and simplicity of the composition is naturally enhanced.
This is followed by the lighting of the model to fill in the shadows of the character. Considering that the main character is in a sunflower field, many of the lighted areas are likely to be blocked by the surrounding sunflowers, so I subjectively reduced the lighted areas of the character.
Set the previous shadow layer to Multipul mode and place it on top of the intrinsic color layer.

Refinement and Adjustment
The basic color and shade of the picture has been established, and then it is time to refine and adjust the work. In terms of color, the inherent color of the plants was a bit too gray, so I adjusted the saturation of the plants up.
Then, based on the shape of the shadows in the previous draft, I reduced the brush size and adjusted the shape of the light and shadow to be more detailed and durable.
A new layer was created to refine and tint above the original layer. This time, the stage of refinement was very special - I did not do a rigorous secondary outline after deleting the previous draft line layer, but started the shaping directly on the color draft. Details such as eyebrows and lips were re-added in the process via a new layer (3-6).
(Why did I do this bizarre operation? Well,I probably hope that there would be a fantastic breakthrough by changing the painting method.)

In this painting method, I often merge with the layer below once I've confirmed that the refinement makes sense, and then continue to make adjustments on a single layer (3-8). From then on, I use the brush 画笔 to further clarify the shape, or occasionally use the auto-selection tool to select a local color block and adjust the color with a soft brush.
Tone adjustment and background refinement
In this step, the facial features have been drawn more prominently, and the overall color tone has been gradually shifted towards yellow in order to emphasize the inherent color of the sunflower.
The background was followed up with the refinement of the figure. The white clouds are briefly outlined in the left and right gaps of the image to explain the scene without overwhelming it. In addition, the background of the sky, which was previously too pure, seemed distorted, so I darkened the sky as a whole and let the top color echo the shade of the white skirt of the figure.

Thereafter too, the refinement work remained on a single layer. After the outer outline became clearer, I supplemented the outline line drawing. The girl's bangs were changed to be blown up by the wind, and the sunflower shape was further enriched by adding midtones and projections to the simple dichotomous base.

Enhance the contrast of the picture
After several adjustments, the picture had become more and more complete, but the image was also getting gray…
As for why I got into this trouble, I really forgot. I mean, who remembers what he/she was thinking two years ago!


I tried to use the Curves tool to bring up the overall brightness of the image, but the adjusted image looked too yellow.

At present, the refinement of the illustration has been basically completed, and the layers have all been merged. Color grading tools in procreate cannot completely solve the existing problem. I had no choice but to export the file to Photoshop, which has a richer color grading system.
Photoshop's Auto-Tone tool
I had heard that the Image - Auto Tone in PS could somewhat remove excessive ambient colors and enhance the color contrast of the picture. So I tried it out immediately.
The effect is quite good! The auto-tone accurately identifies the blue of the sky, the skin tones of the people and the yellow of the sunflowers, and the image suddenly becomes full of impact.
The downside is that the contrast is a little too strong, which hurts the eyes when you look at it. So I first placed the image at 50% transparency on top of the layers.
Afterwards, use the Color Balance tool to make the highlight field of the picture slightly reddish.

Final refinement and adjustment
The post-production of the image is still in the process of some color fine-tuning and styling improvements.
I redrew the hands of the figures, and the greenery of the sunflowers was redrawn. The sunflower bush at the bottom of the image was also slightly brightened to make the image appear more airy.
The illustration is now finished.
-
Finally! The process of sunflower girl is finally available to every patreons.
Because it was drawn two years ago, part of the process file has been lost. I had to manually add some process diagrams recently so that you guys can read smoothly. Though there must be some differences with the original version, the process is to follow the original work, don't worry!
The refinement process of this picture is quite bumpy, although it is only a single person illustration, the conservative painting time is higher than fifteen hours. This is why the process recorded in the artbook"Alkiad" looks so...abbreviated. Many frustrations are too difficult to explain in a book, so please ignore the tutorial in that artbook and take this post as an accurate record!
Still thanks to my friend Valerie for providing me with help for English translations, and thank you for your reading and support, comments are still welcome!
See you next time!
Comments
Hey Sheya some images are missing here especially in the end. Just pointing it out. I come back to this post often and just noticed it.
Shashwat Kumar
2022-08-12 10:26:17 +0000 UTCI hope my art book can be sold in other countries, but we have not found agents yet ;-;
Sheya
2022-04-04 10:08:17 +0000 UTCHi April, at the moment the art book can only be purchased on Taobao in China (https://market.m.taobao.com/app/bsop-static/bsop-punish-test-webapp/deny_pc.html?uuid=fa5b654c9e577ba31be65cf39a191461&action=deny) and Booth in Japan(https://comicup.booth.pm/items/2528229)
Sheya
2022-04-04 10:06:48 +0000 UTCit depends on where you are, I bought her artbook on Taobao through a proxy service ^^
Khue Le
2022-04-01 16:57:01 +0000 UTCaaaaaaaaaaa thank you for sharing this! i love it so much, also i love your artbook sm ;;;
Milk Tea
2022-04-01 05:38:26 +0000 UTCHi Sheya, will you ever publish your art book for international shipping? ^^
April
2022-04-01 05:04:54 +0000 UTC