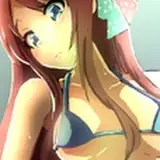
This post documents the process of an experimental piece done last month.
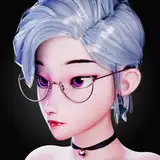
The inspiration comes from the lighted balloons I often see on the street at night.
I have always found balloons like these to be very attractive in paintings. The transparent material, the dotted lights, and the flowers in the ball add a lot of romance to the picture to the way they shine in the night sky.
I simply came up with a sketch of a young girl embracing multiple lighted balloons, took corresponding photos of the balloons, and placed the photos under the draft as a physical reference.
Collection of modeling, light and shadow and color reference pictures.
Firstly, I asked a friend of mine for photos in accordance with the draft’s pose. Then, I used DAZ & Blender for assistance with the light and shadow. Finally, I searched for appropriate night lighting photos for my reference.


Halfway through the coloring process, I gradually realized that the current half-body composition of the figure would put too much weight on the lower half of the image, so I moved the entire figure layer down and added new balloons to the top left of the picture.
Adjust the balloon tone to a warm color to make a sharp contrast of warm and cold with the cool tone of the characters and background.

In the subsequent refinements, I changed the character’s hair color to white—because it was difficult to coordinate the contrast between dark hair in the black night.
Export the image and select the "Dramatic Warm" filter effect in the Ipad album.

Create a new layer and set its mode to Add, spray some warm brown tones on the character’s face to enhance the luminous effect of the balloon.

Use the brush tool to add more brush strokes to the picture to enrich the light and shadow layers.

Brighten the overall brightness of the characters and increase the city lights in the distance.

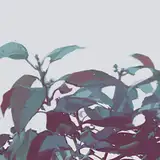
I wanted to extend the image and the background to be richer, so I widened the size of the canvas again.
The sky at the top of the picture looks more expansive, and the bottom left corner of the picture has enough space to put in the scene.
I placed my own travel shot of a river at the bottom left of the frame and darkened the sky for a nicer night scene.

Adjust the brightness of the bridge for the city lights to look more vibrant against the nightsky.
Afterwards, use the app Glaze to add oil painting strokes around the picture, star patterns to the nails of the character, and more lights to the balloons along with the other small details.


The illustration is successfully finished!
It took me a long time to finish it. I started it during my graduation trip after completing the second round of refinement steps, and during the trip a strange obsession drove me to adjust the composition and details over and over again... I'm unexpectedly used to this kind of effort and fervent adjustments lol.
Still sending thanks to my friend Valerie for helping me with the English translations. I hope this process of sharing will be helpful to you!
Thank you all for your support and see you next time~