
This post introduces the process of the seventh illustration in my series titled “Yesterday Once More”.
The yard illustration is intended to depict my vivid childhood memories of feeding chickens in the yard of my grandmother's house.
I took advantage of my winter break to go home and took a series of photos of the place to get started.

I started thinking about the composition based on the existing materials, and placed the image of the main character squatting and feeding the chicks on the right side of the frame, while the rest of the area focused on the scene of the grandmother's house.
Based on the existing draft, I collaged the photos I took into the canvas to fit the composition draft.
I wanted a cooler, more serene atmosphere, and so I studied Bato Dugarzhapov's work as a color reference.
I treated the background wall of the picture as cool blue and green according to the reference colors, and interspersed some warm yellow and red to make the picture more rich in warmer and cooler tones.

While drawing this series, I had a habit: after each freshly colored sketch, I compared it with the previous ones to see if the series is in harmony. The main color of ‘Yard’ is not obvious compared to the previous three color drafts, and the main character in red is slightly similar to the color of the red school bag in the newsstand.

Therefore, I decided to enhance the blue-green tones of the figure and reduce the proportion of red in the picture. I replaced the red fruit with a cooler yellow, and the character's red coat was changed to a blue-gray color.

Now, the image is still a bit gray, so I imported the image into the ipad's filter software: MIX, to fine tune the colors.

Import the resulting image back into Procreate to get a fully merged layer 4-1.

Personally, I have strict accuracy requirements for myself in terms of light, shadow and scene perspectives. So, I built a simple model reference based on the current picture to check if I had any mistakes with perspective.
The model assistance helped me a little bit (not particularly useful); one of its benefits was that the ground shading type became clearer after the reference.

The second is some spatial perspective fine-tuning, for example, I noticed through the model that the current potted plant was too round at the top, so I compressed the space at the top of the potted plant.
After refining the figures appropriately and adding hair, I noticed a new problem: the scale of the subject was a bit too small compared to the first three images in the series.
 I tried to enlarge the whole picture and remove unnecessary areas to make the picture look fuller and more focused.
A new layer was added above the original layer (4-4) for continued refinement.
I added a blue and white striped pattern to the character's top and changed the pants from white to a light brown shade that echoes the potted plant. The scene behind the character and the plants were also delivered more clearly.
Import the existing image into Glaze, a filter program for iPad, to get an image with oil brush strokes. Then import the image back into Procreate and use the eraser to clean up the center area—leaving only the shadows of the trees at the bottom of the image with oil brush strokes. (Layer 6-3)

(For a detailed text explanation of the application of the oil painting filter Glaze, please click the process tutorial of Early Spring & Summer)
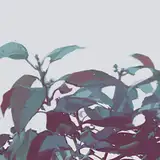
Finally, add branches to the slightly empty area above the figure to enhance the effect of the girl surrounded by leaves.
At this point, the illustration is finished.
-
The process of this series (“Yesterday Once More”) is much easier to understand when you read all of these tutorials.
First, search for a lot of first-hand photo materials, then start the draft and search for color references that match your imagination; use the model for assistance if you can't draw the shape correctly and cut to adjust the composition if something looks strange to you. After everything looks fine, it's a long process of refinement and polishing, and you can use the filter software to enrich the color and texture if you want.
Still sending thanks to my friend Valerie for helping me with the English translations. I hope this process of sharing will be helpful to you!
Thank you all for your support and see you next time~
Annie T.
2023-09-21 00:55:06 +0000 UTCSheya
2022-11-03 00:37:20 +0000 UTCMilk Tea
2022-11-02 01:59:28 +0000 UTC